Materials Needed:
- Backing (I used a king sized sheet)
- Batting (make sure it’s bigger than your quilt top)
- Quilt top
- Thread to tie with. I used the heavy emroidery floss they sell in ropes with the normal floss, it doesn’t seperate out like the lighter weight floss. I think it was DMC Color Variations Pearl Cotton Size 5
- Needle, preferably a large curved needle (remember the eye will need to be big enough to get the string through!)
- Safety pins
- Tape (we used duct tape!)
- Scissors
Tying Instructions:
- Find a big, flat, empty piece of floor, carpeting does not work well.
- Tape the backing to the floor, right side down & tape securely around edges
- Put down batting & tape securely to back & floor
- Put down quilt top, right side facing up. Start in one corner & make sure the top is pulled tight when you tape it down. There should not be any bulges or wrinkles in any of the layers.
Our floor space wasn’t big enough to lay out the whole quilt so we used safety pins along that side to make sure it was straight & then rolled up the extra.
- I think we started at one end near the middle. I decided to machine quilt the borders so we started in a few rows from the edge. Start at the ‘bottom’ or ‘top’ of the quilt and work all the way to the other end.
- Decide how far apart you would like the knots. I went with every corner which was about every 6″. Thread a long piece of floss and using your curved needle bring the thread down & back up around one of the corners (or wherever you decide to have the knots). Pull the thread through leaving a tail. Move on to the next spot.
- Keep going down the length of the quilt. When you run out of thread tie the tails together & keep going. When you get to the end of a row turn around and go back down the next row.
- When you are all done you get to start the fun part! Use your scissors to cut midway between each ‘knot spot’. Tie the ends together several times (I think i went with 3x). Cut off the extra & keep going!
- When you’re all done take some time to celebrate. All you have left is the binding!!

NOTE: As you are going through this process you need to keep checking the entire time to make sure there is no bunching of material in the layers, no wrinkles, and make sure your needle is going through all 3 layers!


Binding Your Quilt:
I’d recommend getting real instructions from a book or a real quilter but this is the way I do it:
- You can either buy pre-folded bias tape or make your own. If you make your own measure the sides of the quilt so you know how much to make (add extra!!).
- You need to cut strips of cloth twice the width of your binding plus1/4″ allowance on each side. So let’s assume you would like to see a 1″ binding around the outside of the quilt – you would need to cut strips that are 2.5″ wide.
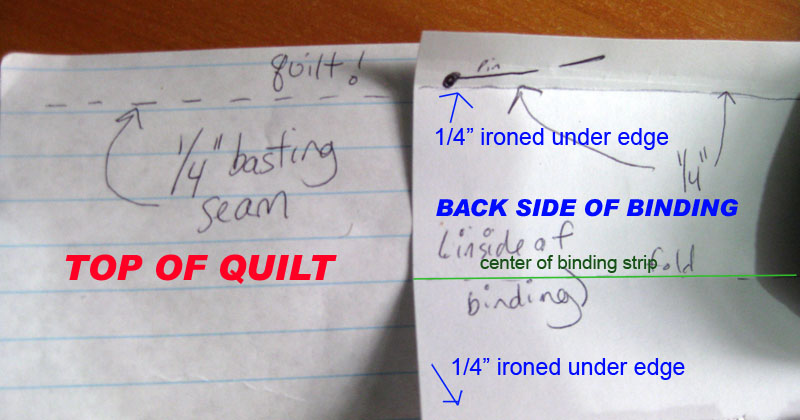
- Iron under 1/4″ all the way along each side. This is a pain in the ass but it will save you alot of time & effort in the long run. An optional step here is to fold the strips in half (also lengthwise) with the ironed edges on the inside & iron that as well.When you’re done sew the pieces together to make a reaaallly long strip.
START HERE IF YOU BOUGHT BIAS TAPE!
- Make sure you have trimmed all the edges of your quilt straight. Baste w/a sewing machine 1/4″ in from the edge all the way around the quilt.
With your binding, unfold one of the 1/4″ sides & pin to the top of the quilt with the fold line matching up to the 1/4 basting seam on the quilt. See my kick-ass highly detailed picture for help.

- The plan is to sew along this line, fold the binding over to the back of the quilt (if you did the optional ironing step it should line up with the edge of the quilt) & hand sew the already folded edge of the binding to the back of the quilt.Like I said, a book might be easier to learn from : )
